Showing posts with label Dessert. Show all posts

Tuesday, November 10, 2009

The Pioneer Woman's Pumpkin Spice Muffins

As you all know by now, I'm a big fan of The Pioneer Woman. I've been following her blog for about two years now and I can't get enough of her witty writing and yummy recipes.

I recently purchased her cookbook, The Pioneer Woman Cooks. As part of my 101 in 1001 list, I will attempt to cook all the recipes in her cookbook. Yes, I am aware that represents a lot of butter. But I figure one or two recipes a week won't kill me.


I kicked it off tonight with a steak and Pioneer Woman's Whiskey Cream Sauce. No pictures but you'll have to take my word for it that it was tasty! In an attempt to make it "healthier", I used fat-free sour cream instead of light cream and it was still delicious. Still not an every day treat but perfect for a special occasion.

But back to the muffins. This is another Pioneer Woman recipe I recently made though not one featured in her cookbook, this one is straight from the web. Here actually.

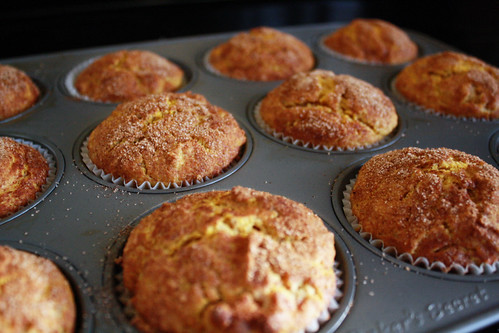
I made them sans frosting to make them more healthy and more breakfast-like (as opposed to dessert-like). These little gems were comforting, filling and yummy! I like their somewhat dense texture - hate when muffins crumble everywhere! Will definitely make again and at 3 points each, a reasonable indulgence.

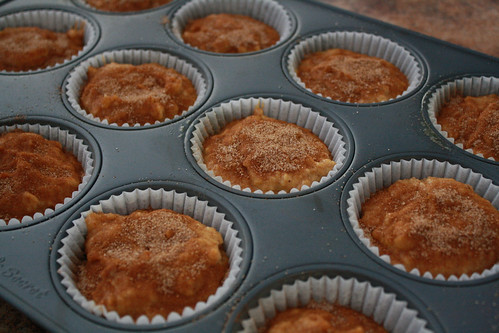
Before baking. See... the tops are sprinkled with sugar, cinnamon and nutmeg... You know that's gonna be good!


Fresh out of the oven!


Hope you give these a try!

Pumpkin Spice Muffins
Adapted from The Pioneer Woman

1 cup flour
1/2 cups sugar
2 teaspoons baking powder
1 1/2 teaspoon cinnamon
1/4 teaspoon ground ginger
1/2 teaspoon nutmeg
1/2 teaspoon salt
4 tablespoons butter, cut in pieces
1 cup (heaping) pumpkin purée
1/2 cup evaporated milk
1 egg
1 1/2 teaspoon vanilla

Topping

2 tablespoons sugar
1 teaspoon cinnamon
1/4 teaspoon nutmeg

Preheat oven to 400 degrees. Prep muffin tins with liners. Sift dry ingredients. Cut in butter until fully incorporated and mixture is crumbly. In a separate bowl, mix together wet ingredients. Pour wet mixture into dry mixture. Fold gently until just combined. Pour into lined muffin tins. Sprinkle cinnamon-sugar-nutmeg topping over the top of each unbaked muffin. Bake for 25 minutes. Allow to cool in pan for 15 minutes, then remove and allow to cool.

Tuesday, October 13, 2009

Cranberry / Orange Zest / White Chocolate Chip Cookies

Apologies for the extended leave - Thanksgiving preparations have kept me busy. And with all that hoopla, I forgot to take pictures of the feast! :( The brined turkey was delightful; I will definitely go this route in the future! Now back on topic with a new recipe (and important arsenal as the holidays get underway - this recipe is perfect for a cookie swap)!

Not to brag or anything but the recipe listed below is the base recipe for the BEST chocolate chip cookies. They are soft, slightly chewy - truly perfect! I love to customize this recipe - this time I used dried cranberries, orange zest and white chocolate chips, you can go plain jane and use regular chocolate chips, white chocolate chips and macademia nuts are sinful, mini M&Ms are fun, butterscotch chips and walnuts are perfect for fall. Which combination would you try?


2 1/4 c. all-purpose flour
1/2 tsp. baking soda
1 c. butter
1/2 c. granulated sugar
1 c. tightly packed brown sugar
1 tsp. salt
2 tsp. pure vanilla extract
2 large eggs
2 c. chocolate chips

Preheat oven to 350F. Whisk together flour and baking soda; set aside. Beat butter and sugars until pale and fluffly. Add salt, vanilla and eggs; mix until well blended. Mix in flour mixture. Stir in chocolate chips.

Drop heaping tablespoons of dough onto baking sheets lined with parchment paper, spacing 2" apart. Bake cookies rotating sheets halfway through until edges turn golden but centers are still soft, 10 to 12 minutes. Let cool on sheets on wire racks 2 minutes. Transfer cookies to wire racks; let cool completely.

Makes about 3 dozen cookies.

Sunday, September 20, 2009

Chocolate Cake with Mocha Buttercream Frosting

Today was my brother-in-law's 18th birthday. (Happy Birthday Joseph!) Of course such an occasion calls for a cake... I chose to bake a chocolate cake with mocha buttercream frosting.


I used The Pioneer Woman's Best Chocolate Sheet Cake recipe (which was pretty darn good though next time I would add just a touch of instant coffee to the batter, to make the chocolate flavor pop just a tad more) and my tried, tested and true buttercream icing recipe (spiked with cocoa powder and instant coffee). And of course, I had to decorate with sprinkles and sparklers. It's just not a birthday cake without them!

Chocolate Cake

2 cups flour
2 cups sugar
1/4 teaspoon salt
2 sticks butter
4 heaping tablespoons cocoa
1 cup boiling water
1/2 cup buttermilk.
2 beaten eggs
1 teaspoon baking soda
1 teaspoon vanilla

In a mixing bowl, combine flour, sugar and salt. Set aside.

In a saucepan, melt the butter and mix in the cocoa powder. Add 1 cup boiling water, allow mixture to boil for 30 seconds, then turn off heat. Pour over flour mixture, and stir lightly to cool. Set aside.

In a separate bowl, beat together buttermilk, eggs, baking soda and vanilla. Stir buttermilk mixture into butter/chocolate mixture. Pour into greased and floured cake pans and bake at 350-degrees. (For 8" rounds, I baked for approximately 30 minutes.)

Mocha Buttercream Icing

2 cups butter
2 cups icing (confectionner's) sugar
1 teaspoon vanilla
2 heaping tablespoons cocoa powder
1 teaspoon instant coffee dissolved in a touch of boiling water

Using stand mixer, cream butter and icing sugar. Mix in vanilla, cocoa powder and dissolved instant coffee.

Assemble and frost cake. Decorate with sprinkles and sparklers. Serve with vanilla ice cream and an off-key rendition of Happy Birthday.

Tuesday, August 25, 2009

Carrot Cupcakes with Buttercream/Cream Cheese Frosting


Sorry I haven't been around in a while. Steve and I welcomed a new family member last week - a 4 month old Newfoundland puppy - and she's been keeping us busy! We're supposed to be on holidays but between puppy training and catching up with friends and family I've barely had a second for myself!

Today was my friend Krista's baby shower (she is due October 3rd, gender will be a surprise) and I volunteered to bake cupcakes. Krista's favourite cake is carrot cake - I baked her a multi-tier carrot "wedding cake" for her wedding shower a little over a year ago and that was a big hit so I thought I'd use the same recipe to make her "baby cakes" (aka cupcakes) for her baby shower. I tweaked the icing recipe - I didn't remember which Cream Cheese Frosting recipe I used for her wedding shower plus I wanted fluffier icing for cupcakes - so I did a hybrid using my legendary buttercream frosting as a base.

I'm a big fan of this carrot cake recipe - moist, flavourful, good balance of carrots and cinnamon, no raisins (yuck)... I believe the recipe is better suited for a flat or layer cake. The cupcakes were good but I found them to be a tad dry (knowing how moist this cake usually is). Still, very good and I will make again.

Carrot Cupcakes

3 cups flour
2 teaspoons baking powder
1.5 teaspoons baking soda
2 teaspoons cinnamon
1 cup cooking oil.

1.5 cups sugar
4 whole eggs
2 cups grated carrots
1 cup chopped nuts (optional)

Sift first 4 ingredients together. Add the rest of the ingredients. Bake for 25 minutes at 300oF.

(If using angel food, loaf or flat pan (13 x 9) bake for one hour. Press top with finger lightly; if cake is done, it springs back.)

Buttercream/Cream Cheese Frosting

2 cups butter
1.5 cups icing sugar (I only had 1 cup but I would recommend using the full 1.5 cups)
1 package cream cheese, softened
1 teaspoon vanilla
Food coloring (optional)

Using mixer, beat all ingredients for approximately 5 minutes until smooth and fluffy. Ice cupcakes.

*** For traditional buttercream frosting, omit cream cheese.

Monday, July 27, 2009

July Daring Bakers' Challenge – Chocolate Covered Marshmallow Cookies (or as I know them, Whippets)

-------------------------

The July Daring Bakers' challenge was hosted by Nicole at Sweet Tooth. She chose Chocolate Covered Marshmallow Cookies and Milan Cookies from pastry chef Gale Gand of the Food Network.


-------------------------

This being my first Daring Bakers Challenge, I decided to bake only one of the two cookies. I chose the Chocolate Covered Marshmallow Cookies (or as they are known in French Canada – Whippets) as I wanted to bake a treat for my grandpa.

Growing up, I remember spending a few days at my grandparents’ house in the summer... My grandpa was a farmer and he’d come in for lunch but on his way back out into the fields, he’d grab a handful of Whippets from a yellow Tupperware container in the pantry… Ahhh, memories… :)


Anyhoo, back to the Whippets! Formal instructions are below but here’s the process as experienced by my hubby and I.

First step was mixing and chilling the dough, then cutting and baking the cookies. I don’t think we rolled the dough thin enough – our cookies ended up puffing up slightly when baking and being a bit thicker than I would have preferred but they were still good. One thing to note - the cookie dough recipe yielded a ton of cookies! Seriously, I think we ended up with about 6 dozen 1.5” cookies; however we only had enough marshmallow to cover about 4 dozen cookies. But no worries, I’m sure the leftovers will be delicious with a cup of tea or coffee. Plain, they remind me a bit of biscotti – crumbly, neutral flavour with just a hint of cinnamon.


Second step was making and piping the marshmallow. Steve took care of the corn syrup mixture while I took care of the egg whites. He used a candy thermometer and so didn’t worry about the consistency of the syrup (aka: “soft ball stage”). It took a while after we incorporated the syrup and the egg whites for the marshmallow to fluff up. After 3 minutes full speed with the stand mixer the mixture still seemed heavy to me and I was getting worried but after a few more minutes and it magically fluffed up. Success! :) Steve and I hurried to pipe the marshmallow on the cookies before it hardened. I piped an outer ring on the cookie, Steve followed piping strawberry jam in the center and I finished by adding a marshmallow cap on top of the jam. We then left the cookies the sit for 2 hours to allow to marshmallow to settle.


Third step was dipping the cookies in chocolate. Important note - we doubled the chocolate suggested in the recipe and still didn’t have enough to cover the 4 dozen marshmallow topped cookies (though we came close)! But for sure, you’ll need to double the chocolate. Anyhoo… Steve looked up and followed instructions to temper chocolate and, as per recipe, we added a few tablespoons of oil to the chocolate. We used canola oil instead of vegetable oil but I don’t think that should matter right? We ended up using a spoon to dip the cookies in chocolate. That process was a lot less messy than I expected it to be. We then set the covered cookies on wax paper to cool and harden. After two hours, the chocolate was still very soft. The next morning, the chocolate looked hard but softened immediately to the touch. Not sure what we did wrong?! The cookies were very good to the taste but the soft chocolate coating sure made them very messy!


This recipe was very labour intensive and I sure hope my grandpa will enjoy his treat. Though the cookies are very delicious, I’m not sure they’re worth the effort but I’m proud to say I conquered my first Daring Bakers Challenge!


Mallows(Chocolate Covered Marshmallow Cookies)
Recipe courtesy Gale Gand, from Food Network website

3 cups all purpose flour
1/2 cup white sugar
1/2 teaspoon salt
3/4 teaspoon baking powder
3/8 teaspoon baking soda
1/2 teaspoon ground cinnamon
12 tablespoons butter
3 eggs, whisked together
Homemade marshmallows, recipe follows
Chocolate glaze, recipe follows

1. In a mixer with the paddle attachment, blend the dry ingredients.
2. On low speed, add the butter and mix until sandy.
3. Add the eggs and mix until combine.
4. Form the dough into a disk, wrap with cling film or parchment and refrigerate at least 1 hour and up to 3 days.
5. When ready to bake, grease a cookie sheet or line it with parchment paper or a silicon mat.
6. Preheat the oven to 375 degrees F.
7. Roll out the dough to 1/8-inch thickness, on a lightly floured surface. Use a 1 to 1 1/2 inches cookie cutter to cut out small rounds of dough.
8. Transfer to the prepared pan and bake for 10 minutes or until light golden brown. Let cool to room temperature.
9. Pipe a “kiss” of marshmallow onto each cookie. Let set at room temperature for 2 hours.
10. Line a cookie sheet with parchment or silicon mat.
11. One at a time, gently drop the marshmallow-topped cookies into the hot chocolate glaze.
12. Lift out with a fork and let excess chocolate drip back into the bowl.
13. Place on the prepared pan and let set at room temperature until the coating is firm, about 1 to 2 hours.

Note: if you don’t want to make your own marshmallows, you can cut a large marshmallow in half and place on the cookie base. Heat in a preheated 350-degree oven to slump the marshmallow slightly, it will expand and brown a little. Let cool, then proceed with the chocolate dipping.

Homemade marshmallows:
1/4 cup water
1/4 cup light corn syrup
3/4 cup sugar
1 tablespoon powdered gelatin
2 tablespoons cold water
2 egg whites, room temperature
1/4 teaspoon pure vanilla extract

1. In a saucepan, combine the water, corn syrup and sugar; bring to a boil until “soft-ball” stage, or 235 degrees on a candy thermometer.
2. Sprinkle the gelatin over the cold water and let dissolve.
3. Remove the syrup from the heat, add the gelatin, and mix.
4. Whip the whites until soft peaks form and pour the syrup into the whites.
5. Add the vanilla and continue whipping until stiff.
6. Transfer to a pastry bag.

Chocolate glaze:
12 ounces semisweet chocolate
2 ounces cocoa butter or vegetable oil

1. Melt the 2 ingredients together in the top of a double boiler or a bowl set over barely simmering water.

Tuesday, July 21, 2009

Lunch Party (Asian Coleslaw, Peanut Dipping Sauce and Raspberry Swirl Cheesecake) + Sugar High Fridays (even though we're Tuesday)

Please scroll down for Sugar High Fridays! I'm a little disorganized this month so Sugar High Friday is being posted on a Tuesday; hey, I'm human!

I had a couple of friends over this weekend for a lunch party. The meal was a collaborative effort on all parts – my friend M. brought delightful smoked salmon canapés, my friend N. took care of summer rolls for the main as well as a tasty noodle salad with peanut dressing and I provided coleslaw with an Asian twist, peanut dipping sauce for the summer rolls and a raspberry swirl cheesecake.

Everything was delicious and we walked (rolled?) away from the table very satisfied.

My friends requested that I share with them my recipes of the day so I figured I may as well post them on here.

Asian Coleslaw
Inspired by All Recipes

3 tablespoons rice wine vinegar
3 tablespoons canola oil
2.5 tablespoons creamy peanut butter
1.5 tablespoons soy sauce
1.5 tablespoons brown sugar
1 tablespoons minced fresh ginger root
4 cloves garlic, minced

1 bag coleslaw mix
1 carrot, julienned
6 green onions, chopped
1/2 cup chopped fresh cilantro

In a medium bowl, whisk together the rice vinegar, oil, peanut butter, soy sauce, brown sugar, ginger, and garlic.

In a large bowl, mix the coleslaw mix, bell peppers, carrot, green onions, and cilantro.

Toss with the peanut butter mixture just before serving. (Will not keep long after – gets soggy quickly.)

Peanut Dipping Sauce
Inspired by She Shimmers

13.5-ounce can of light coconut milk
2 ounces (approximately 1/4 cup) of red curry paste
3/4 cup creamy peanut butter
1/2 tablespoon salt
3/4 cup sugar
2 tablespoons of cider vinegar
1/2 cup water
1 clove garlic, minced

Put everything into a pot and bring to a very gentle boil over medium heat, whisking constantly.

Simmer for 3-5 minutes over low heat; be careful not to let the mixture scorch at the bottom of the pot.

Take the pot off the heat and serve – hot or cold – with summer rolls or satay.

***I thought the final result was a tad sugary for my taste. Next time I might use natural (unsweetened) peanut butter or decrease the sugar to ½ cup.


Raspberry Swirl Cheesecake with Chocolate Crust
Inspired by Pink Bites


The Raspberry Swirl Cheesecake is also my contribution to Sugar High Fridays created by Jennifer and hosted this month by Sweet Tooth. The theme was "all time favorite dessert" - yeah, it had to be cheesecake!

For the crust:
2 cups Oreo crumbs
1 stick butter, melted
2 tablespoons sugar
1 teaspoon vanilla extract

For the cheesecake:
3 sticks of cream cheese, 8 oz each room temperature
1 cup sugar
3 large eggs
1 cup heavy cream
1 tablespoon of vanilla extract

For the raspberry swirl:
8 oz of raspberries, fresh or defrosted if frozen
3 tablespoons of sugar

Preheat oven to 350 degrees F. Begin to boil a large pot of water for the water bath.

Mix together the crust ingredients and press into your preferred pan. You can press the crust just into the bottom, or up the sides of the pan too - baker's choice. Set crust aside.

Combine cream cheese and sugar in the bowl of a stand-mixer and cream together until smooth. Add eggs, one at a time, fully incorporating each before adding the next. Make sure to scrape down the bowl in between each egg. Add heavy cream and vanilla, blend until smooth and creamy.

Pour batter into prepared crust and tap the pan on the counter a few times to bring all air bubbles to the surface.

Place raspberries in a food processor and blend it until combined. Pass it through a fine mesh and discard the seeds. Add sugar and mix well to incorporate it. Use about 2/3 of the sauce on the batter and the rest as a sauce to be served on the side.

Incorporate the sauce to the batter after pouring the batter into the pan. The best way of doing this is by the tablespoon full, going around the cake pan. After this is done, use a chopstick or a knife to swirl the sauce in the cheesecake until it creates a nice pattern.

Place pan into a larger pan and pour boiling water into the larger pan until halfway up the side of the cheesecake pan. If cheesecake pan is not airtight, cover bottom securely with foil before adding water.

Bake 45 to 55 minutes, until it is almost done - this can be hard to judge, but you're looking for the cake to hold together, but still have a lot of jiggle to it in the center. You don't want it to be completely firm at this stage. Close the oven door, turn the heat off, and let rest in the cooling oven for one hour. This lets the cake finish cooking and cool down gently enough so that it won't crack on the top. After one hour, remove cheesecake from oven and lift carefully out of water bath. Let it finish cooling on the counter, and then cover and put in the fridge to chill. Once fully chilled, it is ready to serve.

Thursday, July 2, 2009

Limoncello Cheesecake

Please, please, please make this today. I promise you'll thank me (unless you're on a diet in which case you'll curse me). It is sooo good! So good I didn't have the chance to take a picture before it was all gone! Seriously, it is THE best cheesecake I've EVER eaten and trust me, I've eaten a lot of cheesecake!!!

I was inspired by this recipe at No Fear Entertaining. Two changes: 1) Instead of graham crackers for the crust I used almond/hazelnut biscottis and 2) I skipped the lemon sauce - I'm a cheesecake purist, I prefer my cheesecake straight up to maximize the taste and texture of the cake.

2 cups biscotti crumbs
1 stick butter, melted
2 tbsp sugar
1 tsp lemon extract

3 sticks of cream cheese, 8 oz each room temperature
1 cup sugar (squeezed together with zest of one lemon)
3 large eggs
1 cup heavy cream
1 tbsp lemon juice
1 tbsp lemon extract
1 tbsp Limoncello

Preheat oven to 350 degrees F. Begin to boil a large pot of water for the water bath.

Mix together the crust ingredients and press into your preferred pan. Set crust aside.

Combine cream cheese and sugar and cream together until smooth. Add eggs, one at a time, fully incorporating each before adding the next. Add heavy cream, lemon extract, lemon juice, and Limoncello and blend until smooth and creamy.

Pour batter into prepared crust and tap the pan on the counter a few times to bring all air bubbles to the surface. Place pan into a larger pan and pour boiling water into the larger pan until halfway up the side of the cheesecake pan. If cheesecake pan is not airtight, cover bottom securely with foil before adding water.

Bake 45 to 55 minutes, until it is almost done - you're looking for the cake to hold together, but still have a lot of jiggle to it in the center. Close the oven door, turn the heat off, and let rest in the cooling oven for one hour. This lets the cake finish cooking and cool down gently enough so that it won't crack on the top. After one hour, remove cheesecake from oven and lift carefully out of water bath. Let it finish cooling on the counter, and then cover and put in the fridge to chill. Once fully chilled, it is ready to serve.

Very rich but VERY GOOD!!!

Wednesday, April 22, 2009

"My Honey Has Left Me" Apple Pie

Have you ever seen the movie Waitress? Fantastic movie, one of my favorites. (And that much more touching knowing the story of its late writer/director/supporting actress, Adrienne Shelly.) Waitress' main character, Jenna, bakes pies and gives them whimsy names according to what's going on in her life: "I Don't Want Earl's Baby" Pie (aka Bad Baby Pie), "Pregnant Miserable Self Pitying Loser" Pie, etc.

Well I decided to name my apple pie! I made this pie before Christmas and froze it, keeping it for a special night where it would be the perfect cap to a great meal. Fast forward to April. After having delicious Maple-Brined Pork Loin with Pesto Pasta and Sautéed Zucchini, I popped this baby in the oven. But just as it was ready, Steve left to run errands and he missed out on warm apple pie... So here you have it - "My Honey Has Left Me" Pie!


Step 1 - Maman's Pie Crust (also known as the Tenderflake recipe)

5 1/2 cups all-purpose flour
2 teaspoons salt
1 lb tenderflake lard
1 egg, stirred slightly
1 tablespoon vinegar
7/8 cup cold water

Stir the flour and salt together. Cut in the lard with a pastry blender or 2 knives until the shortening is in pea size pieces. In a measuring cup, combine the egg and vinegar. Add enough cold water to make one cup. Stir the liquid into the flour mixture, adding just enough to make the dough cling together. Stir the water in with a wooden spoon until mixed thoroughly, then gather the dough into a ball, and separate into 6 portions. Cover and refrigerate for one hour, you can chill overnite, covered, providing you leave it at room temp for 15 mins before rolling.

Lightly flour surface and roll into circles, then pat the dough into pie pans, following pie recipes. Be careful not to stretch the dough.

Yield: 6 pie shells or 3 double pie shells

Step 2 - The Filling

3 pounds assorted apples (I used Granny Smith apples), peeled, cored, and cut into 1/4-inch thick slices
2 tablespoons fresh lemon juice
1/4 cup granulated sugar
1 teaspoon ground cinnamon
1/4 teaspoon freshly grated nutmeg
1/8 teaspoon salt
1 tablespoon unsalted butter, cut into small pieces

In a large bowl, toss together the apples, lemon juice, granulated sugar, flour, cinnamon, nutmeg, and salt; arrange in the chilled pie shell. Dot with butter.

Step 3 - The Sum of All Parts

Egg whites

Brush the rim of the pie shell with egg whites. Place the second piece of dough on top, and gently press over the apples. Gently press the top and bottom pieces of dough together to seal. Using kitchen scissors, trim the top piece of dough to a 1-inch overhang all around. Tuck dough under, and crimp edge as desired. Cut three vents in the top to allow steam to escape.

Freeze until firm, about 30 minutes (or until ready to eat). Meanwhile, preheat the oven to 400 F. Place pie on a parchment-lined baking sheet, Bake until the crust begins to turn golden, about 20 minutes. Reduce oven temperature to 350 F. Continue baking, rotating sheet halfway through, until the crust is a deep golden brown and the juices are bubbling and have thickened, 40 to 50 minutes more. Transfer pie to a wire rack to cool completely.

Yield: 1 pie

Sunday, April 19, 2009

Maltesers Cookies

Scrumptious cookies with a nice malty flavor. Perfect with a tall glass of milk!


Thanks to Cheryl at Cooking, Dunkin Style for this tasty recipe! :)

1 c. butter, softened
3/4 c. brown sugar, packed
1/3 c. sugar
2 eggs
1 tsp vanilla
1/2 tsp salt
2 1/4 c. flour
2 tbsp Ovaltine
1 tsp baking soda
2 c. Maltesers, chopped

Cream butter and sugars. Beat in eggs and vanilla. Combine dry ingredients and gradually add to creamed mixture. Stir in Maltesers and shape into 1 1/2" balls.

Place 2" apart on cookie sheet lined with parchment paper. Bake at 375 F for 10 minutes or until set. Transfer to wire rack and cool.

Makes approx. 2 dozens.